
DIY Network’s Sara Bendrick Masters Tool Organization with a New Shed

You might remember how, a couple of months ago, I worked on my friend’s yard. I introduced a shed and other storage units to help with the overall organization of the place. And now, I’m doing it again, but this time, in my own yard.
So my tool organization was… not that good. I had a shed, but over the years I’d gotten so many new tools that now it was too small. This resulted in me having a mess inside and outside my current storage unit. Oftentimes I have a hard time finding things, because it is so packed; I need to push everything out of the way to get there.
I’ve been really trying to be efficient with my time lately and disorganization definitely slows me down. Plus, it can be stressful when you can’t find what you need! So, I decided that I was ready for a new shed.

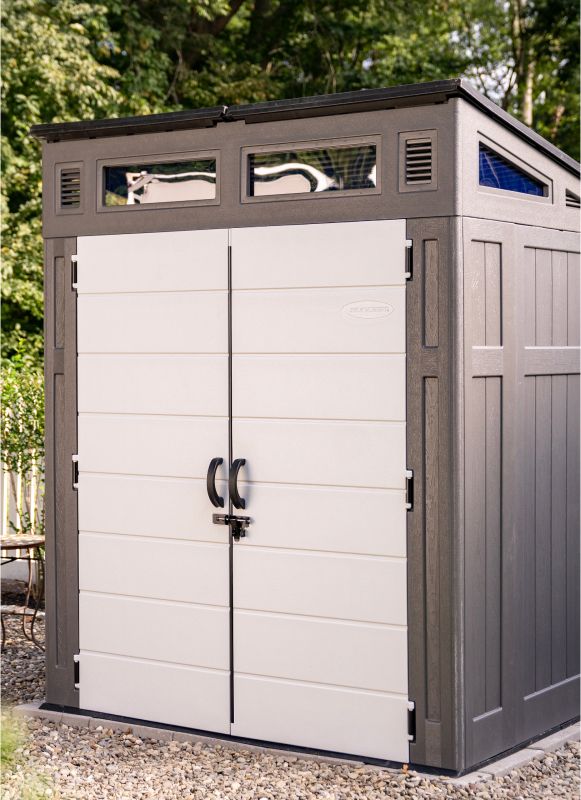
There are many types of sheds at different price points and styles. My criteria for sorting through the many options was value, price, and ease of maintenance over time, so I ended up choosing to go with a large resin shed from Suncast that met my needs.
I decided to partner with Suncast to build this spacious shed (8 ft. x 10 ft Tremont Storage Shed) to help me solve my messy storage situation!
Let’s get to the shed building!
When assembling a shed this size, you want to select a location that is easy to access and level. So if you have a concrete pad already, that’s great! If not, you can pour a concrete foundation or build a wood frame foundation on a gravel base like I did. You want to avoid building the shed on unstable surfaces like directly on gravel, dirt, or grass.

You should anchor large sheds like this. To do this, you need different hardware, depending on if you’re anchoring it to wood or concrete.
Following the tips and instructions in the Suncast website, I prepared the base of my shed. I did so by placing a layer of compacted gravel and leveling it. I then built the foundation frame, placing it and making sure it was level side to side.
Now time for the shed! I grabbed all the recommended tools and unboxed all the shed parts to check and layout inventory. The instructions are pretty straightforward. It is best built with two people, although I was able to do a decent amount of it solo and call-in help for certain steps when I needed it.

The nice thing about Suncast is that you don’t need any power tools so you don’t need to be a pro to put it together. The most challenging part to me was lining up the holes for the door windows to screw together. I found that the best way to do it is placing them upright (like the instructions say… lol) and working with someone to get the corners attached.

The pieces of the shed are fairly lightweight, but combined make a pretty sturdy shed. Plus, since their products are made out of resin, they won’t rust or rot. They’re also very easy to clean! A hose and mild soap can get rid of any dirt and grime.
All and all I am so happy I can finally put my tools in their long-term home to help me organize, allowing me to focus my time on running landscape jobs, not sorting through piles of tools!


